Secara lalai iTunes atau Finder membuat sandaran peranti iOS ke folder yang tersimpan dalam pemacu dalaman. Tidak ada tetapan khusus yang dapat anda aktifkan dan pilih lokasi lain. Sandaran ini boleh berjalan ke beberapa gigabait. Oleh itu, untuk pengurusan storan yang lebih baik, anda mungkin ingin menukar lokasi sandaran iPhone anda pada Mac atau PC anda. Izinkan saya menunjukkan kepada anda bagaimana anda dapat memindahkan lokasi sandaran iOS lalai.
- Tukar Lokasi Sandaran iPhone di Mac Running macOS Catalina atau yang lebih baru
- Pulihkan Folder Sandaran iPhone ke Lokasi Asalnya pada Mac
- Tukar lokasi iTunes Backup Menggunakan iPhone Backup Extractor
- Sudah Mengubah Lokasi Sandaran iTunes Tetapi Tidak dapat melihat Sandaran?
- Cara Mengubah Lokasi Sandaran iTunes iTunes pada PC Windows
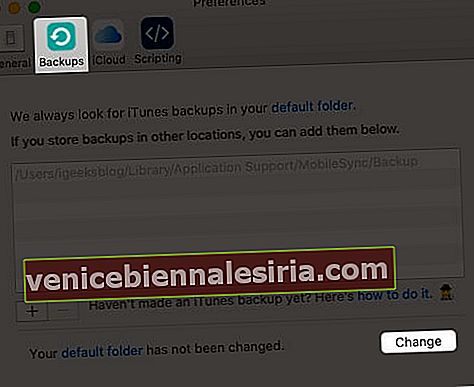
Tukar Lokasi Sandaran iPhone di Mac Running macOS Catalina atau yang lebih baru
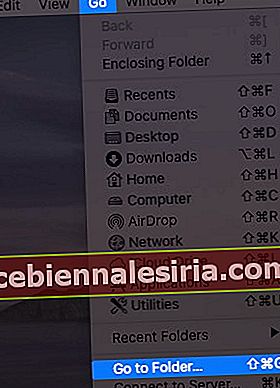
- Dari bar menu atas, klik Go → Go to Folder… Ketik atau salin-tampal alamat tepat ini ~ / Library / Application Support / MobileSync

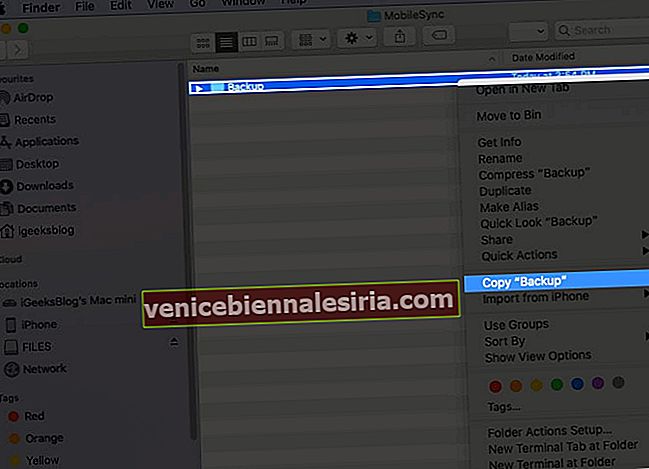
- Anda kini berada di lokasi di mana Mac anda membuat sandaran secara lalai. Klik kanan pada folder Backup dan pilih Salin "Backup" .
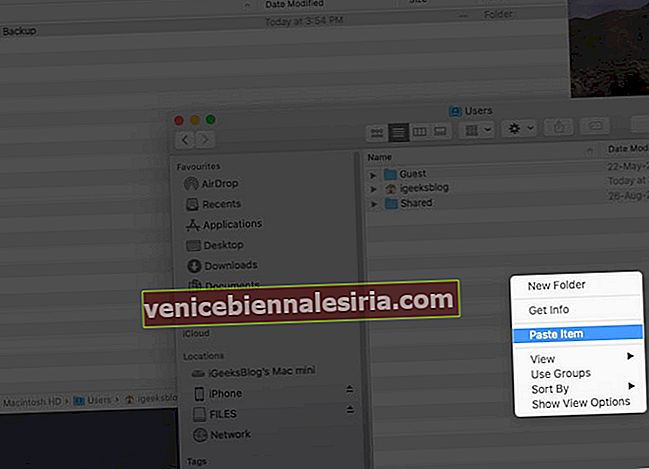
- Sekarang, (buka tetingkap Finder kedua dan) pergi ke lokasi di mana anda mahu folder sandaran iPhone baru anda. Ia boleh menjadi Desktop, Dokumen, folder baru di suatu tempat. Apabila anda berada di lokasi tersebut, klik kanan dan pilih Tampal Item . Biarkan proses menyalin folder Sandaran semasa ke lokasi baru ini selesai. Pastikan tetingkap Finder ini terbuka. Anda memerlukannya pada langkah 6 di bawah.
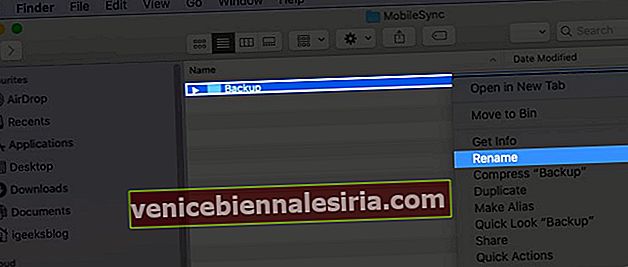
- Setelah menyalin, kembali ke tetingkap Finder pertama (~ / Library / Application Support / MobileSync), klik kanan pada folder Backup, dan pilih Rename (atau pilih folder dan tekan kekunci enter).
 Sekarang tambahkan .old ke nama fail. Hasilnya, nama folder ini akan kelihatan seperti Backup.old
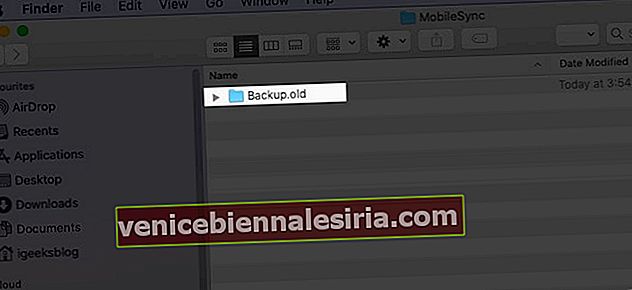
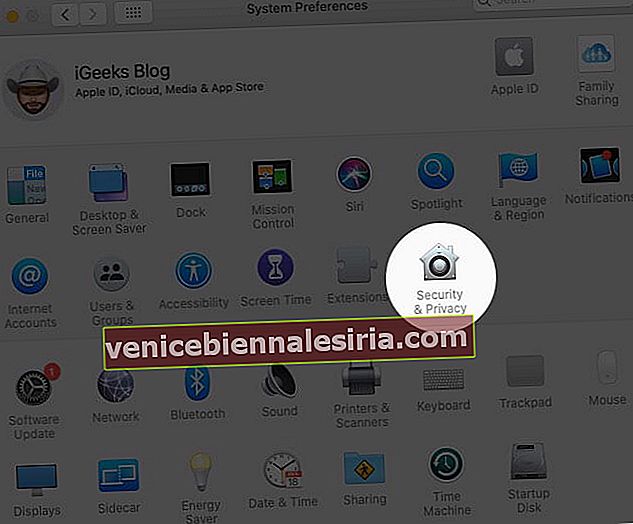
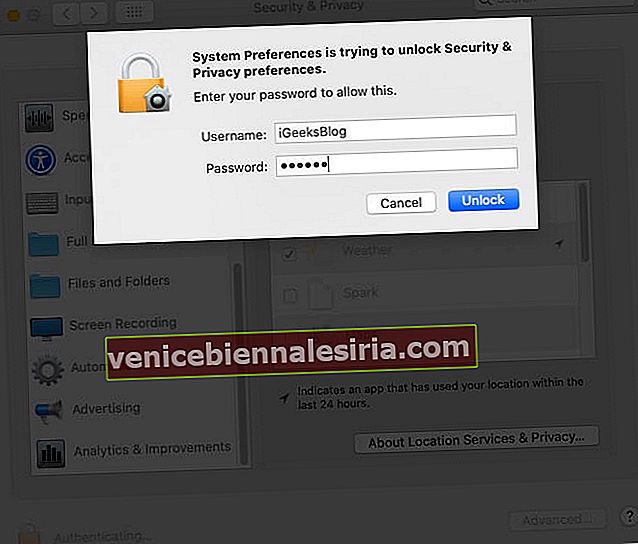
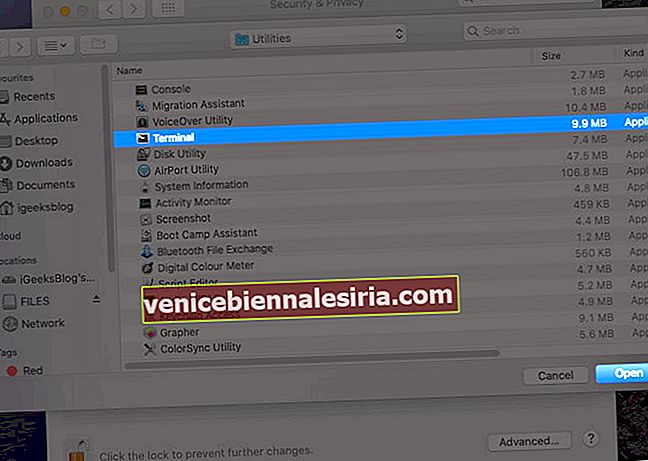
- Dari kiri atas, klik pada Logo Apple → Keutamaan Sistem → Keselamatan & Privasi → tab Privasi → klik pada ikon kunci , dan masukkan kata laluan Mac anda untuk meneruskan. Sekarang, dari Bilah Sisi kiri, klik pada Akses Cakera Penuh → klik pada ikon tambah kecil ( + ). Dari folder Aplikasi → Utiliti → pilih Terminal dan klik Buka . Selepas ini, anda boleh mengklik ikon kunci sekali lagi dan menutup tetingkap ini.

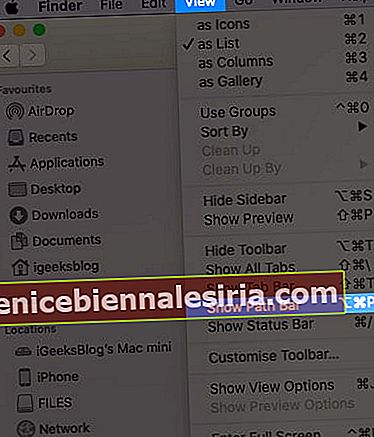
- Sekarang, anda harus mengetahui lokasi sebenar folder Sandaran baru. Untuk ini, dari tetingkap Finder, klik pada View dari bar atas, dan pilih Show Path Bar . Anda akan melihat baris nipis di bahagian bawah yang memberitahu anda lokasi sebenar folder Sandaran baru ini. Pastikan tetingkap ini terbuka.

- Tekan Command + Spacebar , cari Terminal, dan buka. Seterusnya, anda harus mengedit perintah berikut agar sesuai dengan komputer anda dan kemudian taip / tampal di tetingkap Terminal.
ln -s /Volumes/Drive/Backup/ ~/Library/Application\ Support/MobileSync/ - Sangat Penting: Mengedit arahan di atas: Buka aplikasi notepad biasa atau laman web seperti editpad.org. Sekarang, sila salin arahan di atas dan tampal di sana. Seterusnya, anda harus mengganti / Volume / Drive / Backup / dengan lokasi folder Backup anda.
Contohnya, lihat tangkapan skrin di atas. Lokasi folder Sandaran saya ialah Macintosh HD → Pengguna → Sandaran . Oleh itu, arahan akan kelihatan seperti:
ln -s /Volumes/Macintosh\ HD/Users/Backup/ ~/Library/Application\ Support/MobileSync/Sekiranya nama lokasi mempunyai dua atau lebih bahagian / perkataan seperti Macintosh HD, anda harus meletakkan garis miring terbalik dan satu. Contohnya, Macintosh \ HD
ln -s /Volumes/Donald/Backup/ ~/Library/Application\ Support/MobileSync/ln -s /Volumes/Donald/iPhone/Backup/ ~/Library/Application\ Support/MobileSync/Now, you know how to change the path address in the command. Next, let us make use of it.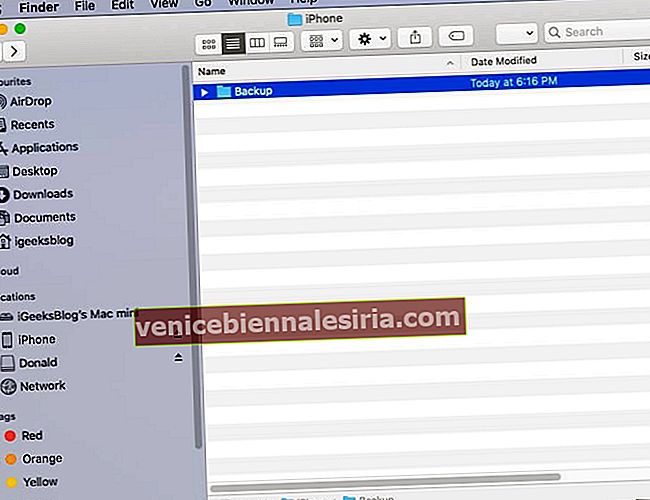
Copy the final command, paste it in the Terminal, and press the enter key.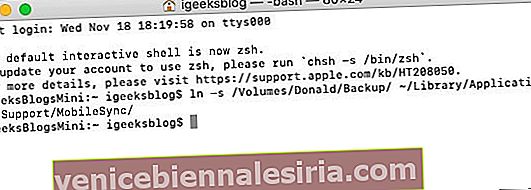 Tip: Now, when you go to the original Backup.old Finder window, you will see a new folder named Backup, which will have a small arrow on it.
Finally, open Finder on your Mac, connect the iPhone, Trust it, and click on Back Up Now. The backup would be made and saved at the new location.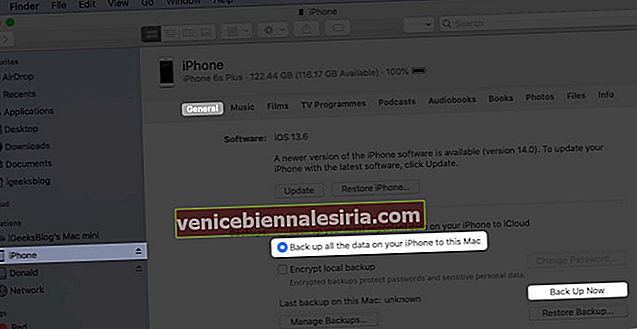


 Sekarang tambahkan .old ke nama fail. Hasilnya, nama folder ini akan kelihatan seperti Backup.old


 Tip: Now, when you go to the original Backup.old Finder window, you will see a new folder named Backup, which will have a small arrow on it.
Notes:
Optional: After you complete the first backup at the new location, you may choose to delete the Backup.old folder. This may free significant space on your Mac.If you opted to back up your iPhone to an external drive, make sure you connect it to the Mac before hitting Back Up Now in the future.
Restore iPhone Backup Folder to its Original Location on Mac
From the Finder window, click on Go → Go to Folder → and enter this location ~/Library/Application Support/MobileSyncRight-click on the folder with an arrow icon and select Move to Bin.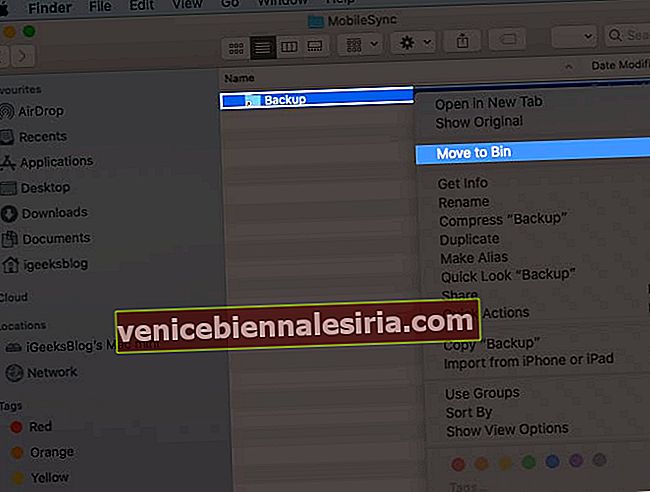
Now, for safety, drag (or copy-paste) the current Backup folder to this location. All future iPhone backups will be saved here, like before. Even if you do not follow this step, the next time you make the device backup, a new folder named Backup will automatically be created.

Do you not want to follow the lengthy process above? Well, here is the most straightforward way to change the iTunes/Finder iPhone backup location on Mac.
How to Change iTunes Backup Location Using iPhone Backup Extractor
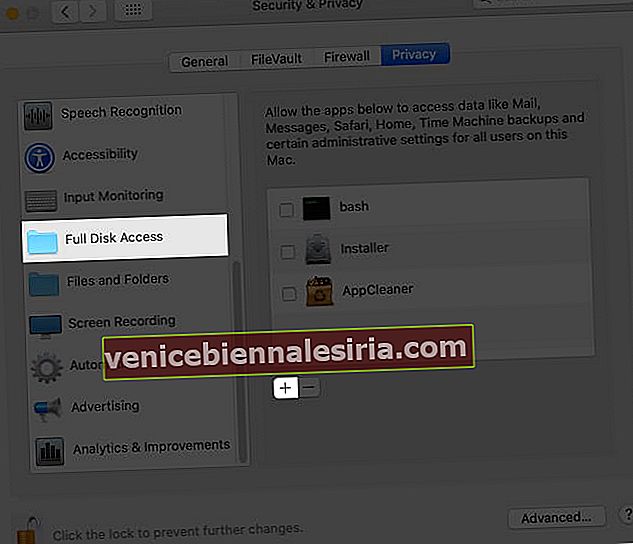
Download iPhone Backup Extractor for free and complete the installation.Important: First time, you may have to open the System Preferences → Security & Privacy → Privacy tab → click on the padlockicon, and enter your Mac’s password. Now, click on Full Disk Access and then the plus sign (+). Next, select iPhone Backup Extractor and click Open.
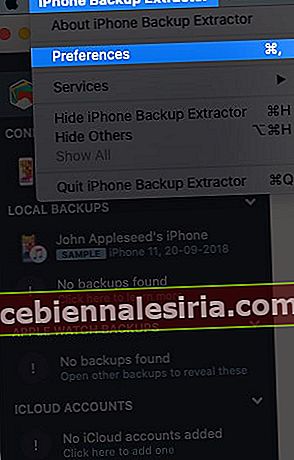
Now come back to the iPhone Backup Extractor app window. (If needed, click on ‘OK, I’ve made this change, let’s restart the app to continue!’) From the top menu bar, click on iPhone Backup Extractor → Preferences → Backups → Change. Now, you may see a popup saying ‘Backup contains data.’ Click on ‘Open.’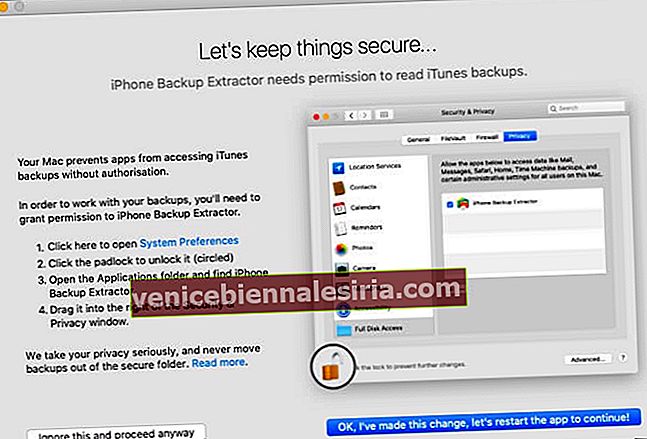
From here, drag the folder with a lengthy name like 149652….. to someplace else, like the Desktop.After that, inside the iPhone Backup Extractor app, click on Change and Select the desired folder.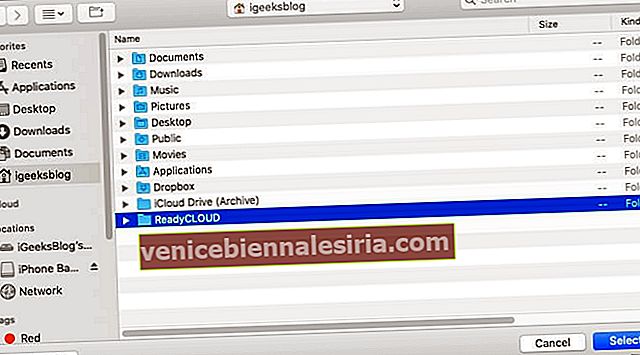


Done! You have successfully changed the iPhone backup folder in just a few steps. To undo this change, click on Revert.
Already Changed iTunes Backup Location But Unable to See the Backup?
Even after you have correctly followed the above steps and are unable to find the backup, then we have a separate guide that has you covered.
Most of the time, if you follow the first manual step, the problem arises due to the wrong location address of the new Backup folder. You must get that right. If this is wrong, go to ~/Library/Application Support/MobileSync and you will see a white Backup symlink instead of a blue folder named Backup with an arrow.
How to Change the iTunes Backup Location on Windows PC
As iTunes won’t let you change it, you need to make way through a symbolic link. Also known as a symlink, it’s a bridge that connects two folders with the same name. Using a symlink, you can direct iTunes to back up data to a dummy folder that you’ll have to create. However, you’ll have to enter some commands in the “Run As Administrator” window. Just make sure that you create a dummy folder in a drive with enough storage space. Like, we created it in D:\. Let’s get started by creating a folder first.
Create a folder named “MobileSync” in the D:\ (d stands for drive) on your computer.To view the by-default location, go to C:\Users\UserName\Apple\MobileSync if you have downloaded iTunes from Windows 10 Store. For the old desktop version, you need to go to C:\Users\UserName\AppData\Roaming\Apple Computer\MobileSyncCut and paste the Backup folder to the new MobileSync folder that you’ve created in D:\Now, run CMD as administrator. To do so, press Windows + R keys together, then type cmd in the search field.Press Ctrl + Shift + Enter to run it as in the administrator.Enter the command mentioned below.
If you’ve downloaded iTunes from the Microsoft store. MkLink /J “C:\Users\UserName\Apple\MobileSync\Backup” “D:\MobileSync\Backup
Enter this code MkLink /J “C:\Users\UserName\AppData\Roaming\Apple Computer\MobileSync\Backup” “D:\MobileSync\Backup” if using the older version.
Now when you back up your iPhone using iTunes, the data will be stored in the D:\MobileSync\Backup folder. Try backing up your iPhone and check if the Backup folder in the D:\ is configured correctly.
iPhone Backup Location Changed Successfully!
This is how you can have new iOS or iPadOS backups to a different location. Changing to some other folder on the same internal disk makes little sense. But doing the same on an external disk frees space on your internal disk.
I hope the above guide was helpful. In case you are facing difficulty at any step, feel free to reach us via the comments section below.
You may also like to read:
Find iPhone Backup Location on Mac and Windows PC3 Ways to Check Folder Size on MacHow to Use Control Center in macOS Big SurHow to Backup and Install iPhone Apps from Mac/Windows Without iTunes


![9 Cara untuk meningkatkan isyarat WiFi pada iPhone dan iPad [2021]](https://pic.venicebiennalesiria.com/wp-content/uploads/blog/132/N61RYIQZSRpic.jpg)